You can set push notifications to appear on your phone when your cameras detect motion, video loss, or low battery (wire-free cameras only).
![]() Important: Your devices must have push notifications enabled, and motion detection configured to receive motion detection notifications. See the article Lorex Cirrus app - Configuring settings, for more information about motion detection settings.
Important: Your devices must have push notifications enabled, and motion detection configured to receive motion detection notifications. See the article Lorex Cirrus app - Configuring settings, for more information about motion detection settings.
Enabling Push Notifications:
- Tap
 , then tap Notifications.
 Tap the Settings Button
 to configure the push notifications settings.
Tap
 to enable push notifications for a specific device.
Once enabled, tap the settings icon.
Configure the following notification options:
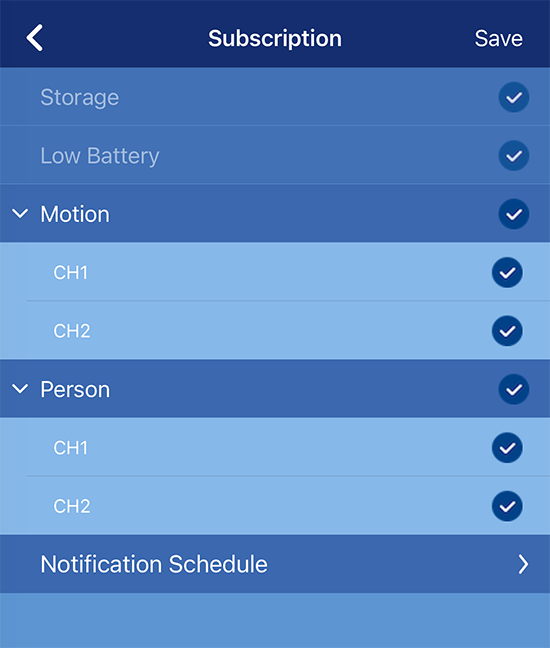
- Storage notification (always enabled by default).
- Low Battery notification (always enabled by default).
- Motion detection notification: Tap the drop-down arrow to enable / disable notifications for each channel.
- Person detection notification: Tap the drop-down arrow to enable / disable notifications for each channel.
- Notification Schedule: Tap to set specific times for notifications.
Setting Up a Notification Schedule:
How to Adjust the Schedule
- Tap or drag on the green bars to add/remove hours.
- Use two fingers to scroll up/down through the schedule.
To configure the notification schedule:

- Filter: Tap the drop-down arrow to select a channel.
- Days: Displays the days of the week.
- Time: Displays the time of day.
- Green bars: Indicate active notification times (default: always on).
Note: Remember to tap Save to apply any changes.
Managing Push Notifications
Notification Screen Overview:
The Notification Screen lists all alerts sent to your phone.
![]() Important: You must enable and configure push notifications before you can view the list of notifications. View the previous section to configure the notification settings, as needed.
Important: You must enable and configure push notifications before you can view the list of notifications. View the previous section to configure the notification settings, as needed.

Controls & Features:
1. Notification List: Tap a notification to view playback of the recorded event. (See "Lorex Cirrus app - Playback" for details.)
- Swipe left on a notification → Tap Delete to remove it.
2. Delete All: Clears all notifications.
3. Select All: Selects all notifications for bulk actions.
4. Settings: Opens the notification settings menu. (See the previous section for setup details.)
Was this article helpful?
That’s Great!
Thank you for your feedback
Sorry! We couldn't be helpful
Thank you for your feedback
Feedback sent
We appreciate your effort and will try to fix the article