The following article answers frequently asked questions about your E872SB Wired Dual Lens Security Camera.
Setup
How do I reset my camera?
- Use a screwdriver to remove the cover on the back of your camera.
- Use a pin to hold down the reset button until you hear the audio prompt. Your camera is now reset.
Can this camera be mounted outdoors?
Yes. Ensure the mounting surface can support at least 3 times your camera's weight - (4.5 lb / 2.04 kg).
How can I optimize the placement of my camera?
- Place your camera in a wide, open space, and avoid placing it near any obstructions.
- Place your camera at the central point of the area you wish to monitor.
- Point your camera where there is the least amount of obstructions (i.e. tree branches).
- Install your camera in a location that is difficult for thieves and vandals to reach.
- Secure cabling so that it is not exposed or easily cut.
Other recommendations:
- Place the camera as close to your Wi-Fi router as possible.
- Reduce the number of obstructive materials between the camera and the router or access point.
How should I position my camera?
When mounting your camera on a wall, make sure of the following:
- Location: Place your camera in a wide, open space, and avoid placing it near any obstructions.
- Height: Install your camera at a height of 10 feet (3 meters) above the ground.
- Angle: Angle your camera to face outwards between 15-30°.
- Distance: Position your camera 22-65 feet (7-20 meters) within points of interest.
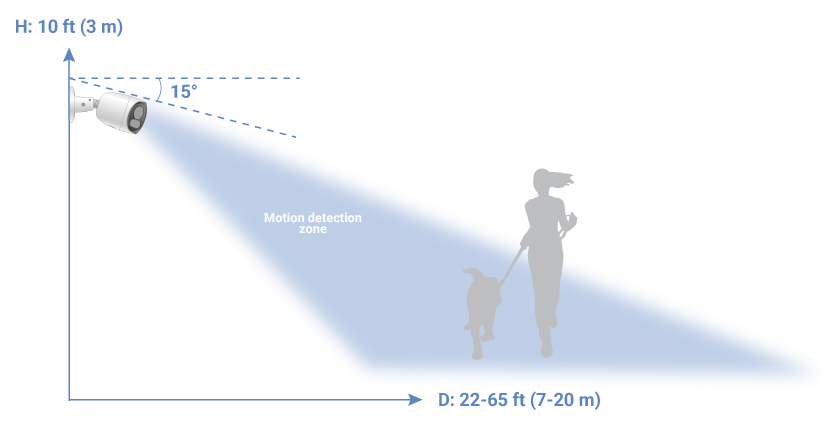
 Accuracy of motion detection will be influenced by multiple factors, such as the object's distance from the camera, the height of the object, and the height and angle of the camera. Night vision will also impact the accuracy and distance of detection.
How do I mount my camera?
For full instructions on camera mounting, refer to E872SB Series - 4K Wired Dual-Lens Camera: Installation .
How do I maintain my camera?
Periodically check and clean your camera dome cover to maintain image quality. Ensure that the camera remains securely mounted and hasn’t been shifted due to weather or tampering.
How do I enable warning lights and siren sounds on my E872SB camera?
Warning lights and siren sounds can be enabled using your compatible recorder. Please refer to “N920 Series: Smart Motion Activated Warning Lights” to activate warning lights, and “N920 Series: Using the Siren” to activate sirens.
App Settings
What is Smart Motion Detection?
Smart motion detection uses an advanced algorithm to distinguish movement between people, animals, vehicles, and packages while providing separate alerts for them.
How do I enable motion detection and smart detection (person, vehicle, animal, package & package removed detection)?
The following steps are applicable to compatible recorders that use the Lorex App.
- Tap
 above the recorder's thumbnail.
 - Select your E872SB camera.
- Click the ellipses (...) in the top right corner of the app.
- Tap Motion Detection Settings.
- Tap
 to enable Motion Detection.
 - Tap on the desired Smart Detection setting (person, vehicle, animal, package & package removed detection) to enable the type of smart detection you want to use.
How do I customize Motion Zones™?
Motion Zones™ allows you to customize your camera's motion detection region. The following steps are applicable to compatible recorders that use the Lorex App.
- Tap above the recorder's thumbnail.
- Select your E872SB camera.
- Click the ellipses (...) in the top right corner of the app.
- Tap Motion Detection Settings.
- Tap Motion Zones™.
- Tap the Motion Zones™ to set up the detection area:
- General Motion Zone
- Person Motion Zone
- Vehicle Motion Zone
- Animal Motion Zone
- Package Motion Zone
- Package Removed Motion Zone
This will take you to a new screen where you can shrink, stretch, or reposition your Motion Zones™ as needed. For full instructions on how to set customized Motion Zones™, refer to "Configure Motion Zones™".
How do I set the Deterrence Light and Smart Security Lighting to activate when smart motion is detected?
The following steps are applicable to compatible recorders that use the Lorex App.
- Tap above the recorder's thumbnail.
- Select your E872SB camera.
- Click the ellipses (...) in the top right corner of the app.
- Tap Light Settings.
- Tap Activate Light on Smart Motion
- Tap on the type of smart detection you are using.
- Tap to enable Deterrence Light and/or Smart Security Lighting whenever smart motion is detected.
- Adjust the light settings, and then tap Save.
How do I turn off the Smart Security Lighting?
The following steps are applicable to compatible recorders that use the Lorex App.
- Tap above the recorder's thumbnail.
- Select your E872SB camera.
- Click the ellipses (...) in the top right corner of the app.
- Tap Light Settings.
- Tap Smart Security Lighting Modes.
- Tap Working Mode to uncheck it, and then tap Set.
As long as all of the Smart Security Lighting modes are not selected, the Smart Security Lighting is turned off. This will not effect the Smart Security Lighting set to activate on smart detection.
How do I customize the Smart Security Lighting?
To enable, disable, and customize Smart Security Lighting settings, refer to E871AB, E872SB, Halo Series, H20 - 4K Dual-Lens IP Wired Security Camera: Smart Security Lighting for more information.
Why am I receiving so many notifications?
You may find that your camera is triggering frequently and sending too many event notifications. Refer to the article "Lorex App - Too Many Notifications" for a few troubleshooting tips to help reduce false alerts.
How do I play Quick Responses?
From your camera's Liveview: Tap the Response button, and then tap a response from the list to hear it play from your camera.
How do I create custom Quick Responses?
The following steps are applicable to compatible recorders that use the Lorex App.
- Tap above the recorder's thumbnail.
- Select your E872SB camera.
- Click the ellipses (...) in the top right corner of the app.
- Tap Quick Responses.
- Tap +.
- Press and hold the record button to create your own custom Quick Response.
- Tap Next, and then enter a name for your Quick Response.
- Tap Save.
- From the list, tap your newly created Quick Response to hear it play from your camera.
How do I access the events Timeline?
The following steps are applicable to compatible recorders that use the Lorex App.
- Tap above the recorder's thumbnail.
- Select your E872SB camera.
- Tap Timeline.
- Scroll through the timeline to view all the events.
How do I change the viewing resolution to SD or HD?
The following steps are applicable to compatible recorders that use the Lorex App.
How do I set my camera to zoom in and follow the subject through the frame?
The following steps are applicable to compatible recorders that use the Lorex App.
How do I record audio with my camera?
The following steps are applicable to compatible recorders that use the Lorex App.
- Tap above the recorder's thumbnail.
- Select your E872SB camera.
- Click the ellipses (...) in the top right corner of the app.
- Tap to enable Audio Recording.
If my camera is installed upside down, can I rotate the camera feed?
Yes, if you enable Image Rotation:
The following steps are applicable to compatible recorders that use the Lorex App.
How do I adjust the right image's vertical alignment in the Lorex app?
The following steps are applicable to compatible recorders that use the Lorex App.
- Tap above the recorder's thumbnail.
- Select your E872SB camera.
- Click the ellipses (...) in the top right corner of the app.
- Tap Splice Distance Setting.
- Adjust the splice distance number for the right image to improve its alignment with the left image.
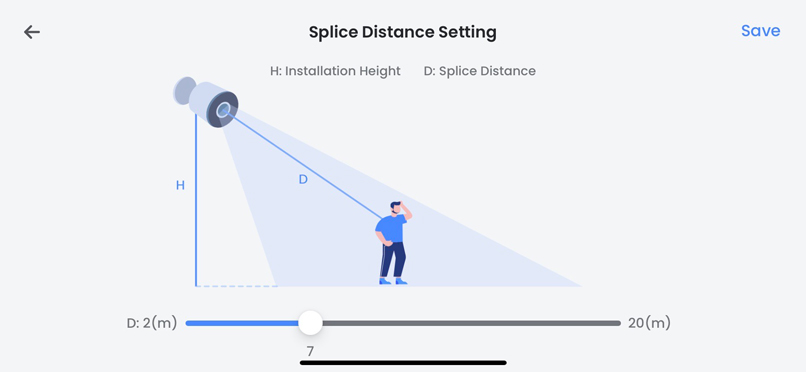
- To shift the right image upwards: Increase the splice distance number
- To shift the right image downwards: Decrease the splice distance number
- Tap Save.
Review your camera's Liveview while making adjustments, as it might require a few attempts to determine the correct splice distance number for aligning the dual-lens image.
The following steps are applicable to compatible recorders that use the Lorex App.
 above the recorder's thumbnail.
- Select your camera.
- Select Snapshot. A camera sounds will begin and a snapshot will be taken.
- To view the snapshot, select on the picture that appears on the lower left corner of your camera's live view after a snapshot is taken. You will then be able to view all previous snapshots.
- To save your snapshot, select it in the snapshot menu. Then select Save.
General
What is a dual-lens camera?
A dual-lens camera uses two cameras simultaneously to create a 180° Field of View (FoV). The feed of both cameras are viewed in one frame as a larger picture. So, only one installation is required for the view of two cameras.
What are the camera's general specifications?
- Video Transmission Technology: IP
- Image Sensor: 2 x 5MP
- Video Compression: H.265/H264 (Main Stream & Sub Stream)
What does "4K" resolution mean for my camera?
"4K" refers to your camera's ultra-high resolution of approximately 4,000 pixels horizontally. This high resolution, also known as Ultra High Definition (UHD), provides significantly sharper and more detailed images compared to lower resolution cameras. 4K cameras are often used in security systems where enhanced clarity and precision are crucial for identifying people, objects, or details in the captured video.
What is IP video transmission?
IP video transmission involves using the Internet Protocol (IP) to send digital video data over an Ethernet network. This enables remote access, maintains video quality, provides flexibility in camera placement, and supports advanced features and high resolutions. IP cameras have unique addresses, allowing them to communicate on a network, and the system is easily scalable for various surveillance setups.
What is the power source for this camera?
The camera is powered using Power over Ethernet (PoE) technology, allowing both power and data to be transmitted through a single Ethernet cable.
What is the camera weight?
The weight of the camera is 1.50lbs / 0.68kg.
What is the environmental rating?
An IP67 rating. This signifies excellent protection against dust and water, making it well-suited for outdoor use in various weather conditions.
What is the operating temperature?
-40°F (-40°C) ~ +140°F (+60°C)
What are the compatible SD cards?
Refer to the article "Compatible SD Cards and Storage Sizes" for more information.
What devices are compatible with my 4K Dual-Lens Security Camera?
Visit the Product Compatibility Chart for more information.
Does my camera have Color Night Vision and how does it work?
Yes. Color Night Vision is a feature that allows your camera to capture and display color video footage in low-light conditions. Traditional night vision on security cameras typically relies on infrared (IR) technology, which captures images in black and white. However, Color Night Vision goes a step further by incorporating additional technologies, such as low-light image sensors and improved algorithms, to maintain color in the video feed even when ambient lighting is minimal. This feature enhances the ability to identify and distinguish objects, people, or incidents in low-light environments, providing more detail compared to standard black and white night vision.
What is the IR Night Vision range?
65 ft (20 m) for complete darkness and 98 ft (30 m) in regular conditions
What is Smart Motion Detection?
Smart Motion Detection utilizes advanced algorithms to intelligently recognize and differentiate between various types of motion. It reduces false alarms by distinguishing meaningful events, allows users to define specific monitoring zones, and includes person, face, face mask, animal, and vehicle detection.
Does my camera have a built-in microphone for audio recording?
Yes.
Does my camera support two-way audio?
Yes.
Are there different recording modes available, such as continuous recording, scheduled recording, or motion-triggered recording?
Yes, you can customize your camera's recording schedule using the recorder. To find instructions on accessing the recording schedule, refer to your recorder's series manual on the product support page
How do I playback recordings?
Stored footage on the recorder can be accessed remotely using the compatible app or on the recorder itself. Refer to your recorder's manual on the product support page for guidance.
What storage does my camera offer?
- Built-in Storage: A microSD card can be inserted for independent recording. Data can be accessed through the camera using a web browser but will not upload to the NVR or to the cloud for mobile app viewing.
- Recorder Storage: The primary storage solution is the Network Video Recorder (NVR). The NVR serves as a centralized hub for managing and storing video data from multiple cameras. NVRs typically offer varying storage capacities, ranging from terabytes to multiple terabytes, depending on the model.
How do I activate the Siren and Warning lights on all my cameras simultaneously?
Activate all Siren and Warning Lights via your recorder (Panic Button). Hold the info/panic button for 3 seconds to activate; they deactivate after 10 seconds.

Can I integrate my camera with a smart home system?
How do I activate the Siren and Warning lights on all of my cameras simultaneously?
Integration depends on your recorder. Check your recorder's spec sheet for compatibility with Google Home or Alexa.
Does my camera support Motion Detection?
Yes. Refer to N920 Series Motion Detection Guide for information on configuring motion detection with your NVR.
Does my camera support Person Detection?
Yes. Refer to N920 Series Person & Vehicle Detection Guide for information on configuring person detection with your NVR .
Does my camera support Vehicle Detection?
Yes. Refer to N920 Series Person & Vehicle Detection Guide for information on configuring vehicle detection with your NVR .
Does my camera support Animal Detection?
Yes. Refer to N920 Series: Animal Detection for details.
Was this article helpful?
That’s Great!
Thank you for your feedback
Sorry! We couldn't be helpful
Thank you for your feedback
Feedback sent
We appreciate your effort and will try to fix the article