The following article provides instructions on configuring and using Auto Tracking on your Pan-Tilt-Zoom Camera.
TABLE OF CONTENTS
- Step 1: Create a Preset (Mandatory)
- Step 2: Add Preset to Smart Plan
- Step 3: Set Up Smart Motion Plus
- Troubleshooting Tips
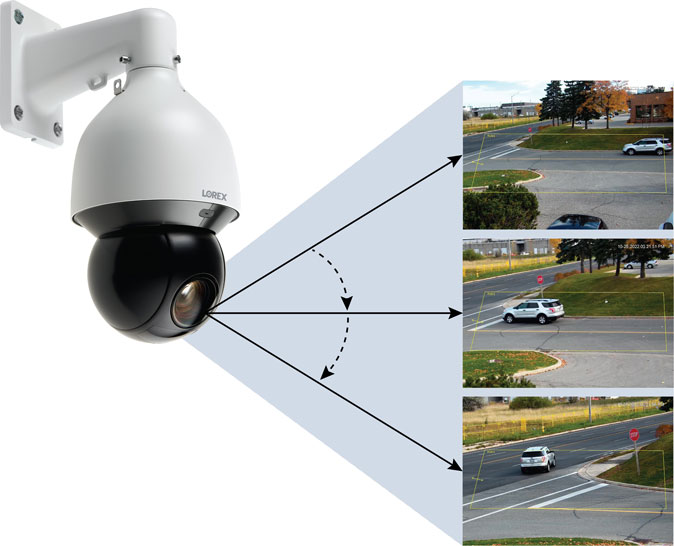
Auto Tracking is an advanced function on the PTZ camera that allows it to cover a large area and to automatically detect, follow, and record moving objects, such as a person or vehicle. The auto tracking technology is composed of both AI detection and tracking. When an object triggers the smart motion plus rule, the PTZ camera will automatically use its pan/tilt rotation and zoom feature to lock in the moving object in the center of the screen and continue to track it without missing any details.
Step 1: Create a Preset (Mandatory)
Before you can enable Smart Motion Plus or Auto Tracking, your PTZ camera needs to have at least one preset location saved. This tells the system where to focus its detection.
- Log into your recorder and click on the PTZ camera channel.
- Right-click to open the Quick Menu, then select Pan/Tilt/Zoom.

- This opens the PTZ controls. Click the right arrow to open the Full PTZ Controls.


- Click the ⚙️ button to enter the PTZ Settings.
- On the Preset tab, use the arrow buttons to position the camera to the desired view (pan/tilt/zoom).

- Click inside the Preset box and assign it a number (e.g., 1, 2, etc.). This defines a specific viewing area.
- Click Setting to save the preset. Repeat for multiple views to cover different zones.
- Once done, left-click twice to exit the settings and PTZ controls.
Step 2: Add Preset to Smart Plan
Now that your camera has a preset, you can tell the recorder to apply smart detection to that specific view using the Smart Plan.
- Left-click on the live camera image to open the Quick Menu again.

- Go to Main Menu > Events > Event Settings > Smart Plan.


- At the top, select your PTZ camera channel, then select the preset you created earlier.
- Click Add to apply this preset to your Smart Plan.
- At the bottom of the screen, enable the Person and Vehicle Detection icon (blue).
Note: Face Detection should be disabled (grayed out), as it cannot run with Smart Motion Plus. - Click Apply to save.
Step 3: Set Up Smart Motion Plus
This step defines what kind of motion your camera will respond to and lets you draw the zone where detection should happen.
- In the same Event Settings section, go to Smart Motion Plus (right under Smart Plan).

- Select your PTZ camera channel at the top.
- Click Add to create a motion rule.
- Under Type, choose the detection type. Recommended: Smart Motion for person/vehicle detection.

- Under Draw, click the ✏️ icon to open the live image.

- On the left, select the appropriate Preset.
- Click the ✏️ icon next to Draw Rule to draw your detection zone. Left-click to mark points. Left-click again to close the shape.
- Under Action, choose one or both: Appear triggers tracking when a person/vehicle appears. Cross triggers when a person/vehicle crosses the zone.
- Under Target, select Person, Vehicle, or both.
- Click OK to return to the Smart Motion Plus screen.
- Under Trigger, click the ⚙️icon to configure what happens during detection:

- Schedule: Click the Setting button to define when this rule should be active.
- Alarm-Out Port: Click Setting to link the event to an external alarm output.
- Post-Alarm: Length of time the alarm will remain active after detection (default: 10s).
- Send Email: Send email alerts when motion is detected (email settings must be configured beforehand).
- Record Channel: Record video when detection is triggered.
- PTZ Linkage: (Optional) Link to specific camera actions.
- Sequence: (Optional) Use if part of camera scanning.
- Buzzer: Activates buzzer on detection.
- Auto Tracking: Enabled by default; keeps camera locked onto the detected target.
- Tracking Duration: Length of time the camera tracks a target (default: 30s).
- Camera Audio: Enables microphone audio recording.
- Post-Alarm / Post-Record: Adjust time after detection event to continue recording.
- Click OK to return to the Smart Motion Plus screen.
- Click Apply to save all settings.
Troubleshooting Tips
Can’t Set Smart Plan or Create Smart Motion
You must create a preset first. Without a preset, these options will not appear or function. Refer to Step 1 above.
Auto Tracking Stops After Manual Use
If you manually move the PTZ camera using the arrow controls, Auto Tracking may stop working (specific issue with LNZ81P25).
Fix: Open PTZ Controls > Full PTZ Controls > Click the Preset button to restore Auto Tracking.

Smart Motion Detection Not Working / No Notifications
Using Scan, Auto-Scan, or Pattern features on LNZ81P25 can cause motion detection to stop. This is due to the camera’s fast movement preventing it from detecting objects effectively.
Fix: Open PTZ Controls > Full PTZ Controls > Click the Preset button to resume normal operation.
Important Note for PTZ Tour Users
If you have configured a PTZ Tour, make sure each preset point is set to 25 seconds or longer. This allows the camera enough time at each location to detect motion events.
- The default preset time is 15 seconds, which is not long enough for smart motion detection to work effectively.
- Preset duration can only be modified through the PTZ camera’s web interface. This setting is not available in the NVR menu. To access the camera’s web interface, enter its IP address in a web browser on the same local network.
How to Turn Off Auto Tracking
There are multiple ways to disable Auto Tracking based on your preferences:
Option 1: Keep Motion Detection, Turn Off Auto Tracking Only
This will stop the camera from physically tracking objects, but motion detection (and alerts/recording) will continue.
- Go to Event Settings > Smart Motion Plus.
- Click the ⚙️ icon under Trigger.
- Uncheck the Auto Tracking box.
- Click OK, then Apply to save.
Option 2: Disable Motion Detection & Auto Tracking
Use this option if you no longer want the system to detect or react to motion in that area at all.
- Go to Event Settings > Smart Motion Plus.
- Either:
- Uncheck the rule to disable it temporarily.
- Or, click the ?️ icon to delete it completely.
Was this article helpful?
That’s Great!
Thank you for your feedback
Sorry! We couldn't be helpful
Thank you for your feedback
Feedback sent
We appreciate your effort and will try to fix the article